How to Exfoliate Your Skin Correctly?
Brand logo
p
parth joshi 20 Sep 2022

How to Exfoliate Your Skin Correctly?

Exfoliation is a tricky subject. But do you know that regular exfoliation can lead to a glowing complexion if you get it right? Yes, you heard it right! When dead skin cells build up on the outer layers of your skin, it can cause your skin to look dull, dry, flaky, and even clog pores. And regular exfoliation can prevent this from happening.

When exfoliating, it's essential to do so safely to avoid damaging your skin or causing acne breakouts. Choosing an exfoliation method based on skin type is crucial since not every way works for everyone.

Let's look at the correct way of exfoliating your skin and the different methods.

Did you know? Dead skin cells make up your skin's first 18 to 23 layers. When these dead skin cells don't sloop off as they should, you can be left with dull, dry skin symptoms. 

What is exfoliating skin?

What is exfoliating skin?

Exfoliating has been used for centuries, dating back to the ancient Romans. Exfoliating skin is the process of removing dead skin cells from the skin's surface. Well, not just dead skin cells; it also helps in reducing skin pigmentation and skin discoloration.

This can be done using various methods, including scrubs, chemical peels, and exfoliating cleansers. When moisturizer is applied, you expose a fresh layer of skin that is ready to retain hydration.

According to research, naturally, our body sheds these dead skin cells, but the rate at which that happens slows down over time. Hence exfoliation and exfoliators are a sword to shed those skin cells fast to give you radiant, glowing skin.

There are many benefits of exfoliating your skin.

  • Exfoliating helps improve the skin's appearance by revealing the healthy, new cells underneath. 
  • It can also help improve skincare products' absorption and effectiveness of other treatments, such as facials. 
  • Help to stimulate blood circulation and promote new cell growth.
  •  Help to reduce the appearance of fine lines and wrinkles. 

What are different methods of skin exfoliation?

How to exfoliate your skin or how to use an exfoliating body scrub? The internet is bombarded with this question. Well, there are various ways you can apply to exfoliate your skin. Mechanical exfoliation involves using a physical tool or device to scrub away dead skin cells, while chemical exfoliation uses chemicals or enzymes to dissolve the bonds between dead skin cells.

Both methods can be pretty effective at sloughing away dead skin and revealing the brighter, smoother skin beneath. 

Mechanical Exfoliants

Exfoliating washcloth/ loofah:

Exfoliating washcloth/ loofah to  Exfoliate Your Skin Correctly

This is a gentler way to exfoliate your skin. Wet the washcloth or loofah and add some soap. Rub the washcloth or loofah over your skin in a circular motion.

Exfoliating gloves are another great way to slog off dead skin cells. Simply massage the product onto your skin in a circular motion and rinse well. 

Exfoliating scrub:

Exfoliating scrub to  Exfoliate Your Skin Correctly

You can also use a sugar or salt scrub. Wet your skin and apply the scrub. Rub the scrub over your skin in a circular motion.

Exfoliating brush:

Dry brushing is a popular method of exfoliation as it is gentle and effective. Use a soft, dry brush on your skin in a circular motion to dry the brush. Be sure to avoid any broken skin or open wounds. 

Dr. Jaishree Sharad recommends, "It is best to start slowly and be gentle when you are new to mechanical exfoliation. To avoid irritating the skin, scrub in circular motions and avoid scrubbing too hard."

Chemical Exfoliants

There are several ways to exfoliate your skin chemically. The most common method is to use an alpha hydroxy acid (AHA) or beta hydroxy acid (BHA) product. These acids work by dissolving the bonds that hold dead skin cells together, allowing them to be sloughed away. AHAs are typically used for general skin brightening and smoothing, while BHAs are better for acne-prone skin as they are oil-soluble and can penetrate deep into pores. Other exfoliating acids include glycolic acid, lactic acid, and salicylic acid. Chemical exfoliation can be done at home using over-the-counter products or at a dermatologist or esthetician's office via professional peels.

How to exfoliate skin correctly?

Ideally, the best time to exfoliate your skin is at night to avoid exposure to the sun on freshly exfoliated skin.

Let's look at the process of exfoliation.

  1. The first rule of exfoliation is to clean your skin thoroughly before exfoliating to get the best results.
  2. Be sure to use a gentle exfoliating agent. Something with tiny beads or granules will work best. You don't want to damage or irritate your skin by using something too harsh. 
  3. Use a light touch when exfoliating. You don't want to scrub your skin too hard, damaging it. 
  4. Make sure to exfoliate all over your face, not just in one spot.
  5. Rinse your face well after exfoliating to remove all the dead skin cells. 
  6. Follow up with a moisturizer to hydrate your skin.

 "No matter how you exfoliate your skin, it's important not to disrupt the skin barrier," says Dr. Nivedita Dadu. Watch the insightful video here on how to exfoliate your skin.

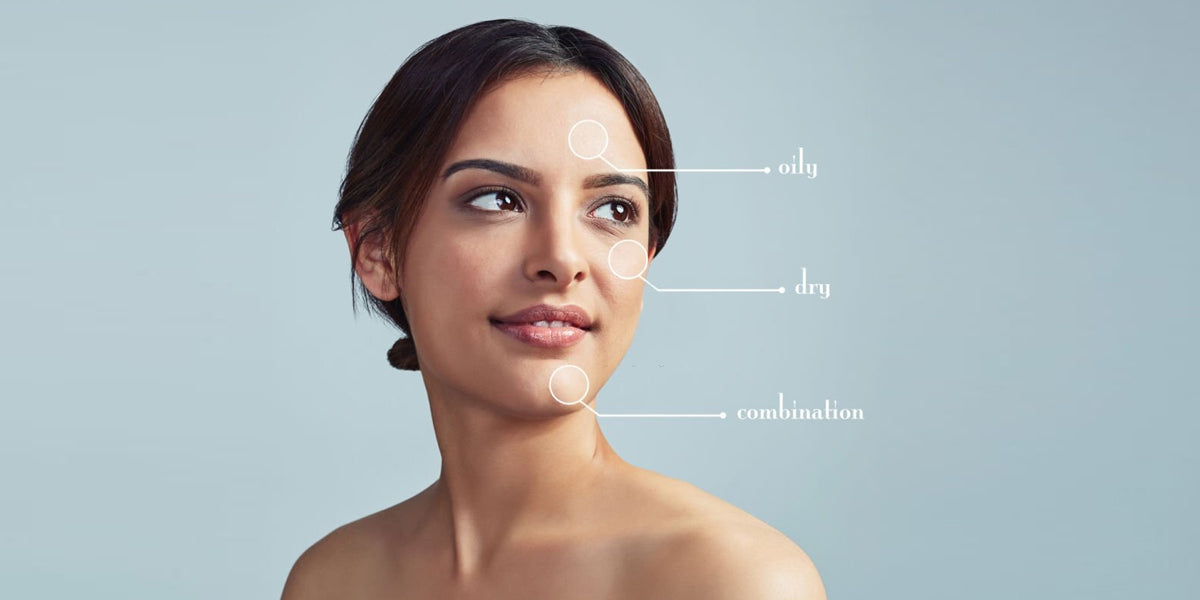
How to exfoliate according to your skin type

Exfoliation for Oily Skin

Exfoliation for Oily Skin

For oily skin, chemical exfoliation works the best. It reaches deep into the pores and removes more built-up oil and debris. Look for exfoliants that contain salicylic acid, glycolic acid, or both. Start with a lower acid concentration and increase the strength as your skin becomes more tolerant. Apply the exfoliant to damp skin and massage it for 1-2 minutes before rinsing it off. Use this type of exfoliation 1-2 times per week for best results.

Exfoliation for Dry skin

Entirely refrain from using physical exfoliators on dry skin. Dry skin is flaky and physical exfoliators can lead to redness and irritation. 

Instead, opt for a mild exfoliating serum or cleanser and immediately follow with your preferred moisturizer. You can also use chemical exfoliants such as AHA and PHA to improve skin texture.

Exfoliating for Sensitive skin

Exfoliating for Sensitive skin

You must be careful when choosing an exfoliating product if you have sensitive skin. You want to avoid anything too harsh or abrasive, irritating your skin. Instead, look for a product that contains gentle ingredients like enzymes or lactic acid. You can also try using a soft washcloth or loofah to exfoliate your skin. Be sure to use gentle, circular motions and avoid scrubbing too hard.

Exfoliating for Combination skin

Exfoliating for Combination skin

A few different types of exfoliation can be beneficial for those with combination skin. Gentle physical exfoliation can help slough away dead skin cells, while a chemical exfoliation can help deep clean and unclog pores. A hydrating mask can also be beneficial for combination skin, as it can help to restore moisture and balance oil production.

Exfoliating for Normal Skin

Exfoliating for Normal Skin

There are many different types of exfoliants on the market, but not all are appropriate for normal skin. A good exfoliant for normal skin should be gentle and non-abrasive so as not to damage the skin. Some popular exfoliants for normal skin include gentle scrubs, cleansing pads, and enzyme-based exfoliants.

A quick framework on exfoliation routine for different skin types

Skin type 

Day  

Exfoliator

Oily 

Three times a week   

Physical or Chemical exfoliation

Dry 

Once a week    

Chemical exfoliation

Sensitive  

Once a week   

Chemical exfoliation

Combination 

Two-Three times a week

Chemical, physical exfoliation, or a combination of both

Normal  

Two-Three times a week  

Physical or Chemical exfoliation


The Bottom Line

Exfoliation is a critical part of a facial routine and can be just as crucial for your body. Exfoliation is one of the best ways to clear pores, removing dirt and dead skin cells. The result is healthier and smoother skin. But exfoliating your skin incorrectly can result in skin irritation, so it is essential to exfoliate the right way. We hope this blog post has helped you understand skin exfoliation and how it can benefit you.


While you look for products to exfoliate your skin, let's look at what's in store for you with Innovist.

Happy exfoliating!

Frequently Ask Questions
Exfoliation frequency depends on skin type. Oily skin can be exfoliated twice a week, normal skin once a week, dry skin once every two weeks, and sensitive skin just once a month with a gentle exfoliant.
Apply a pea-sized amount of scrub to moist skin, avoiding the eye area. Gently massage in circular motions without applying too much pressure to prevent irritation and hyperpigmentation. Rinse with lukewarm water and follow with a toner and a hydrating moisturizer.
After exfoliation, moisturize your skin to restore hydration. Use a lotion, cream, or lightweight facial oil and massage it gently into your face and neck. Avoid applying products on irritated or wounded areas.
Do not rinse off an exfoliant immediately—allow 15–20 minutes for the actives to work (for chemical exfoliants only). Avoid sun and wind exposure for at least 24 hours because freshly exfoliated skin is more sensitive and prone to irritation and premature ageing.
Be gentle while exfoliating to avoid damaging the skin, always moisturize afterward, and apply sunscreen before stepping outdoors as exfoliation increases sun sensitivity.
Breakouts after exfoliation may occur due to over-scrubbing, using products too harsh for your skin, or having naturally sensitive skin that reacts with inflammation. Reduce frequency or switch to a milder exfoliant to observe improvement.
Avoid exfoliating if you have open wounds, cuts, or sores. If you experience redness, tingling, or peeling, take a break. People with eczema, psoriasis, or other skin conditions should consult a dermatologist before exfoliating.
FAQ collage image placeholder
Strawberry legs treatment

Strawberry Legs: Causes, Treatments & Tips to Prevent Them

Ever seen small dark spots on your legs that give your skin the appearance of the surface of a strawberry? Yep, that's what most people refer to as strawberry legs or strawberry skin. Don't panic, this condition is extremely common and completely treatable. If you’re wondering how to get rid of strawberry legs or how to make your skin look smooth and clear again, you’re in the right place. This blog breaks down what causes strawberry skin, how to treat it, and real ways to prevent it from coming back—plus some product recommendations that work! What Are Strawberry Legs? Strawberry legs are those dark spots or small dots on your legs that look like the seeds on a strawberry. These dots tend to be open pores or hair follicles plugged with: Dead skin cells Oil or sebum Dirt or bacteria Shaving residue or ingrown hair But wait. Another reason for strawberry skin is folliculitis—a hair follicle inflammation. There are two varieties: Bacterial folliculitis: Bacteria cause it and produce red, pus-filled bumps Fungal folliculitis: Yeast causes it; manifests as itchy, acne-like breakouts Knowing what strawberry skin is can assist in selecting the proper treatment for smoother, bump-free legs. How to Remove Strawberry Legs: 7 Effective Ways Want to know how to get away with stubborn strawberry legs without harsh remedies? Here's what works: 1. Try Salicylic Acid for exfoliation Salicylic Acid is a BHA that goes deeper than regular scrubs—it dissolves oil, clears clogged pores, and reduces inflammation. This makes it super effective against the trapped keratin, dead cells, and ingrown hair that show up as “strawberry legs.” Instead of juggling different products, you can get the same BHA benefits daily with Chemist At Play Exfoliating Body Wash, already powered with Salicylic Acid to gently unclog and smooth your skin. 2. Exfoliate with a Body Scrub (2–3 times/week)  Regular exfoliation is key to tackling strawberry legs because it clears out dead skin buildup and unclogged pores that cause those tiny dark spots. It also helps your skin absorb moisturizers better and keeps ingrown hairs in check. For a gentle yet effective option, Chemist At Play Gentle Exfoliating Body Scrub does the job perfectly, powered with brown sugar, coffee, natural AHAs, and ceramides. It buffs away dead skin while locking in moisture, smooths rough patches, reduces tan, and leaves your skin soft and even-toned. 3.  Look out for AHAs & Niacinamide-based lotions  AHAs gently exfoliate by loosening dead skin cells and unclogging pores, while Niacinamide helps brighten and even out skin tone. Together, they work to smooth rough, bumpy skin and reduce the appearance of dark pores that make legs look like strawberries. If you’re looking for an easy way to include these ingredients in your routine, Chemist At Play AHA Body Lotion is a great option. It hydrates while delivering both exfoliation and skin tone improvement in one step. 4.  Shave Correctly Shave with a clean, sharp razor Always shave using a hydrating gel or cream Choose the grain of your choice to shave to prevent ingrown hairs 5.  Don't Dry-Shave Dry shaving causes friction and clogged pores. Always get your skin wet and soften the hair before shaving. 6.  Change Hair Removal Procedures Opt for waxing or epilators if shaving leads to bumps or ingrown hair. The hair is pulled out from the root by these treatments, minimising follicle clogging. 7.  Think About Laser Hair Removal It’s one of the most effective long-term fixes for strawberry legs since it reduces ingrown hairs and dark pores. But let’s be real, it’s also pretty expensive and not always an option for everyone. If it feels heavy on your pocket, you can always switch to our specially designed products for strawberry legs that give you smooth, clear skin without burning a hole in your wallet. Tips to Prevent Strawberry Legs Now that you’ve learned how to treat strawberry skin, here’s how to prevent strawberry legs from showing up again: Exfoliate before shaving Shave with cream or gel, never dry Moisturise post-shave and daily Wear breathable fabrics after hair removal Steer clear of picking ingrown hairs Use clean razors and utensils Apply non-comedogenic lotions and oils Summary Strawberry legs may be widespread, but they're entirely avoidable with the appropriate skincare routine. By applying mild exfoliating products, shaving carefully, and moisturizing your skin, you can easily display your smooth legs. Desire noticeable outcomes? Begin with Chemist At Play's Gentle Exfoliating Body Scrub and Daily Exfoliating Body Wash—they're designed to combat strawberry skin head-on. Shop Now for smoother, bump-free legs! Other Articles You May Enjoy Clearing up strawberry legs is just the beginning of your full-body skincare glow-up. But why stop at smooth legs? If you’re looking to take your body care routine to the next level, check out our other helpful guides. Learn how to eliminate stubborn elbow and knee pigmentation or understand the causes and solutions for mouth pigmentation. Because let’s be honest—smooth, even-toned skin shouldn’t end at the knees!

dandruff treatment

A Complete Guide to Dandruff Causes, Symptoms & Treatments

If you're reading this, you probably know more about dandruff than most persistent flakes, an itchy scalp and multiple failed “miracle” treatments. Dandruff isn’t a new issue and neither are the remedies. From home hacks to expensive formulas, the suggestions are endless. But what works for one scalp might not work for another. Some deal with dry dandruff, others with oily scalps or fungal issues. The key to treating dandruff is understanding your scalp and its specific triggers. In this blog, we’ll break down common symptoms and proven treatments to help you find what actually works for your scalp type Dandruff Symptoms Most people think dandruff is just a dry scalp problem that can be fixed by moisturizing the scalp with oils or masks before shampooing to wash away the flakes, but it's a more complicated condition. Here are some common dandruff symptoms: Persistent itchy scalp, often worsening after sweating White or yellow flakes visible on the scalp, hair, or shoulders Greasy or oily roots that show up after shampooing Spots of redness or slight irritation on the scalp Flakes showing up on eyebrows, beard, or behind the ears These signs show that your scalp is responding to something more than dryness, can be an oily environment, fungal growth, inflammation, or product sensitivity. That’s why scalp treatment for dandruff that only tries to moisturize or "dry it out" tends to fall short.  It is vital to know the signs and reasons behind dandruff formation to be able to find targeted dandruff treatments that effectively target both the flakes as well as the root causes. What Causes Dandruff? As discussed, dandruff may be caused by various scalp imbalances occurring together. The following are the most frequent triggers that you need to know: Fungal Growth (Malassezia) When scalp hygiene is poor or oil accumulates, the natural fungus Malassezia  breeds and degrades sebum into irritating byproducts. This can lead to inflammation, itching, and excessive dandruff. Antifungal actives like Piroctone Olamine or Zinc PCA are commonly used in effective anti-dandruff treatments to control this imbalance. Hard Water & Styling Product Buildup Hard water or excessive use of heavy styling products (such as gels, sprays, and serums) may cause residue buildup to clog your scalp. This blocks up your hair follicles and interferes with your scalp's renewal cycle. This may lead to dullness, itchiness, and flaking over time, requiring targeted dandruff shampoo and scalp detox products to remove the buildup. Over-washing or Under-washing Over-washing your hair removes the natural oils on the scalp, whereas under-washing leads to the buildup of oil and dirt. Both situations disturb the barrier and pH of the scalp, putting it in an aggravated state of flaking. Finding the optimal frequency of shampooing helps maintain the health of the scalp and supports any dandruff treatment. Excess Oil & Sebum Buildup Oily scalp types can harbour dirt, dead skin, and sweat, which provide an ideal breeding ground for flaking and itching. Buildup also nourishes Malassezia, leading to severe dandruff. For oily scalp types, a clarifying scalp treatment is usually required in order to balance sebum levels and restore equilibrium. Stress & Hormonal Fluctuations Chronic stress will cause cortisol levels to spike, influencing your scalp's oil production and immune response. The same effect can be seen from hormonal fluctuations (such as puberty or menstruation), causing an oily or dry scalp. This imbalance usually triggers flare-ups, so your usual dandruff treatments are less effective unless the root cause is addressed. Weather Changes & Seasonal Triggers Cold winters dry out your scalp, making it flaky and itchy, while hot, humid environments cause sweating and oiliness, both of which interfere with your natural scalp balance. Switching your regular shampoo or introducing a soothing scalp treatment for dandruff in your routine can help keep things in balance during seasonal shifts. Home Remedies for Treating Dandruff When you search for dandruff home remedies, you’ll find hundreds of DIY tricks, but not all home remedies work for every scalp. Here are a few that have shown promise in dandruff treatment at home. 1. Diluted Tea Tree Oil Scalp Treatment Tea Tree Oil is perhaps the most extensively researched natural ingredient for dandruff treatment. It contains terpinen-4-ol, a potent compound with antifungal and anti-inflammatory properties that help to stop Malassezia-connected dandruff growth. How to use: Combine 4–5 drops of tea tree oil and a carrier oil (such as coconut or jojoba), massage it onto your scalp, leave for 30 minutes, and then rinse. Use once or twice a week for  2. Aloe Vera Gel (Fresh or Pure Extract) Aloe vera is effective for sunburn, but it also contains natural enzymes and anti-inflammatory properties that can help soothe itchiness and redness on the scalp caused by dandruff. How to use: Apply fresh aloe vera gel on your scalp and leave it on for 30 minutes before washing out with a mild, sulphate-free shampoo. Use 2–3 times a week for anti-dandruff.  treatment. 3. Apple Cider Vinegar Rinse Apple Cider Vinegar restores your scalp's pH balance to stop the chances of fungal growth and excess product buildup. Its natural acids act as a gentle exfoliant that can remove flakes without scrubbing. How to use: Mix 1 part ACV with 2 parts water, pour onto the scalp after shampooing. Leave it on for 5 minutes, then rinse thoroughly. Do not use if your scalp is sensitive or has an open wound. You can use Bare Anatomy Anti-Dandruff Conditioner on the lengths to get smoother, flake-free hair. 4. Coconut Oil  Coconut oil is rich in lauric acid, an antifungal and moisturising agent. It repairs the scalp barrier and also combats Malassezia overgrowth that is responsible for flakes. How to use: Massage warm coconut oil into your scalp, leave for 1–2 hours, and shampoo with Bare Anatomy Anti-Dandruff Shampoo for extra-long dandruff control. Do this once or twice a week for dandruff treatment. 5. Yoghurt & Honey Mask Yogurt is full of probiotics and lactic acid that keep your scalp microbiome in balance. Honey, on the other hand, is antimicrobial and a natural humectant. It calms irritation and retains scalp moisture for effective dandruff treatment  How to use: Mix 2 tbsp plain yoghurt with 1 tbsp honey, apply to the scalp, leave for 20 minutes, and wash with lukewarm water. Use once a week for best results. 6. Bonus Remedy: 100% Pure & Natural Rosemary Essential Oil Rosemary essential oil is most commonly recognized for hair growth, but it's also effective against fungi that cause dandruff. It also helps to enhance blood flow to the scalp, soothe scalp itching and discomfort, and support follicle health. While most people turn to kitchen remedies for dandruff, Pure Rosemary Essential Oil is one natural solution that’s backed by traditional practices and science, yet still underrated when it comes to scalp treatments for dandruff. How to use: Mix 3–5 drops of 100% pure rosemary essential oil with a carrier oil, massage onto your scalp, leave for 30 minutes or overnight, then rinse thoroughly. Conclusion There’s no one-size-fits-all dandruff treatment. What works wonders for one scalp might not do much for another. That’s why it’s important to go beyond just removing flakes and really understand what’s triggering your scalp issues to find the right solution.  While home remedies can offer some relief, they should always be approached with awareness. The best option is to choose targeted, science-backed formulations that support your scalp’s natural balance without causing more harm. Also, read our blog on ways to fix an oily scalp to understand how an oily scalp is different from a dandruff-prone scalp.

Rosemary for Hair

Rosemary for Hair: Benefits, Types & Ways to Use Rosemary for Hair Growth

Rosemary for hair has made a serious comeback in recent years and for good reason. It’s one of those rare ingredients that’s been around for centuries, and now, even science is backing up what tradition always supported. From beauty creators to dermatologists, everyone’s talking about how rosemary seems to address almost every hair concern.  From hair thinning, breakage, or an irritable, itchy scalp, it has quickly become a go-to for anyone looking to enhance hair health, naturally. That said, not everyone gets it right the first time. Maybe you’ve tried rosemary for hair, but didn’t see any results, or perhaps you found the process of making the final product so messy that you never gave it another go. Well, that’s exactly why we have created this guide. In this blog, we will discuss everything you need to know about using rosemary for hair, plus explain the simplest ways to include rosemary products in your everyday hair care routine. The Science Behind Using Rosemary for Hair Rosemary (Rosmarinus officinalis) ranks among the most tried-and-tested ingredients in hair care history. Once a universal staple in every apothecary workshop, the scented Mediterranean herb was a go-to ingredient in potions and herbal remedies for almost everything. Centuries later, rosemary is still a valued part of many modern products, especially in hair care. This is because research & science indicate that rosemary stimulates blood circulation in the scalp and feeds hair follicles, which helps to make a hospitable environment for healthy hair growth. It is also known to soothe scalp inflammation often caused by dryness, itchiness, dandruff, and slowed growth. Thus, rosemary is the only natural ingredient that benefits both at the root level (scalp health) and also along the length (strand strength). This makes it a perfect remedy for anybody experiencing major hair concerns like thinning, breakage, or weak, lifeless hair. In short, rosemary for hair is not just an old traditional hoax; it’s a science-backed ingredient that gives real, visible results. What Are the Benefits of Rosemary for Hair? Rosemary has several advantages when used for scalp and hair care. Here are some of the best-known benefits of rosemary for hair: Promotes Hair Growth Rosemary for hair growth is one of the most popularly searched terms across the internet. It is said that rosemary enhances blood circulation in the scalp, which can help reactivate dormant hair follicles and promote new hair growth. Thus, using an Advanced Hair Growth Serum that combine rosemary with other science-backed ingredients can help reactivate the growth cycle and promote new hair growth. Reduces Hair Fall & Thinning If you have been finding extra strands on your pillow or shower drain, using rosemary for hair might just be the answer. Rosemary helps in delivering essential nutrients to the hair follicles, which makes the hair healthy & stronger.  Not only does it minimise hair fall, but it also increases hair density over time. Control Dandruff and Itchy Scalp The anti-inflammatory and antimicrobial properties of rosemary help in soothing scalp irritation and itchiness. With its balancing effect on sebum production, it prevents the overgrowth of dandruff-causing microbes, thus enhancing overall scalp health. Strengthens Hair Strands Rosemary also benefits your hair length by strengthening the hair shaft and making it more resistant to everyday damage. Regular usage of rosemary-based conditioners or masks can help diminish breakage, brittleness, and split ends, giving your hair a smoother appearance and stronger feel. Delays Premature Greying Although rosemary can't turn back the clock and reverse greying, its strong antioxidant activity can help to slow it down. Regular use of rosemary on hair can reduce oxidative stress and shield hair follicles from external damage, thus delaying premature greying. Advanced anti-grey serum with rosemary also promote general scalp health, preserving natural hair color for a longer period of time. How to Use Rosemary for Hair? There are multiple ways to use rosemary for hair. Whether you like the minimal mess-free yet super effective products or you prefer to make your own DIY solution, here are the most convenient ways to use rosemary: Rosemary Oil Rosemary oil benefits hair by enhancing scalp circulation & promoting faster hair growth.  How to use: Massage a few drops of rosemary oil into the scalp and leave it on for at least 30 minutes or overnight before washing. DIY method: Mix dried rosemary in any carrier oil of your choice. For extra benefits, add fenugreek seeds & cloves. Heat it gently, then let it cool and strain. Use 1–2 times a week or as per your need. Ready-to-use: Bare Anatomy Rosemary Oil for Hair Growth is a lightweight, non-sticky formula that can be directly applied to the scalp to stimulate growth in a few weeks. Rosemary Water Rosemary water for hair maintains daily scalp health & also promotes hair smoothness.  How to use: Spray on your roots & lengths after showers or whenever your hair needs some extra nourishment. DIY method: Boil fresh rosemary leaves in water. Let it cool down, then strain and store in a spray bottle. Ready to use: Bare Anatomy Rosemary Water Spray is a mess-free and ready-to-use product made with 100% natural rosemary extract.  Rosemary Essential Oil Rosemary essential oil for hair has multiple benefits. It helps with hair growth, combats hair fall, and improves scalp health. It is also used for skin, nail, & body care. How to use: Mix 2-3 drops with a carrier oil (like coconut or castor oil). Massage it on the scalp, and leave it on for at least 2 hours before rinsing it off. You can try Bare Anatomy 100% Natural Rosemary Essential Oil, made with premium rosemary leaves using steam distillation for maximum purity. Looking for More Hair care Tips? Check out our blog How to Get Rid of Dandruff on the Scalp Without Drying Out Your Hair

Oily Scalp Treatment

How to Fix an Oily Scalp Without Drying Out Your Hair?

The main reason for an oily scalp is the excessive production of sebum, a natural oil released by your sebaceous glands on your scalp. This oil is essential for protecting the scalp and keeping hair hydrated. Although sebum is necessary for a healthy scalp, excess levels mixed with sweat can cause oily hair that feels greasy, looks limp and is hard to manage. To break this cycle of oil imbalance, switching to a targeted yet gentle hair care routine can help in oily scalp treatment. In this guide, we’ll decode why sebum build-up occurs and share ways to manage an oily scalp, without drying out your hair. Understanding the Sebum & Scalp Connection The scalp is an extension of your skin, and like facial skin, it has sebaceous glands that make sebum, a natural oil to moisturize and protect the scalp and hair shaft.  This protective natural oil creates a film on the scalp and along the hair shaft, retaining moisture and protecting against environmental damage. However, when sebum production is more than your scalp requires, it may combine with sweat, dirt, and dead skin cells, leading to clogged follicles causing an oily scalp and oily hair. The sebum composition may differ between individuals depending on age, diet, and skin health. This affects how oily your hair feels on a day-to-day basis. Thus, it’s important to identify the underlying triggers that may cause sebum buildup on the scalp, so that you can select a product that meets your oily hair treatment needs. What Triggers Sebum Overproduction? Various internal and external influences can send your sebaceous glands into overdrive. Understanding these can help manage an oily scalp and prevent oily and greasy hair. Here are some common yet often overlooked triggers: Hormonal fluctuations Thyroid function & androgen changes, particularly during puberty, menstruation, pregnancy, or PCOS, can alert your body to secrete more sebum. This hormonal change is the most prevalent cause of having an oily scalp, particularly in women between their 20s & 40s. Genetic predisposition Your genes may naturally influence how much sebum your scalp produces. If oily skin or oily hair runs in your family, you’re likely to inherit the same scalp tendencies. Studies suggest that nearly 50% of sebum output variability is genetically determined. Humidity and weather Oily scalps get worse in warm, humid climates. High temperatures cause more sweating, which combines with excess sebum, trapping dirt and clogging follicles. This residue makes your oily scalp sticky and hair greasy, even within a few hours of washing. Over-washing & harsh shampoos Regular washing of your hair, particularly with sulphate-based shampoo, dries out the oils on the scalp. This has a rebound effect, whereby your glands produce more sebum to make up for the lost oil, forming a dryness-oiliness cycle. Product buildup & poor scalp hygiene Excessive use of heavy conditioners, styling creams, or oils can clog pores on your scalp. When all these products combine with sebum, sweat, and dead skin cells, they create a sticky layer that suffocates the scalp, leading to persistent oily hair and dullness. Unbalanced diet and lifestyle High-sugar, high-fat diets and lack of quality sleep can trigger inflammation and hormonal imbalance, both of which affect sebum production. Even chronic stress has been found to increase cortisol levels, indirectly leading to oiliness and flakiness on the scalp. Medical conditions Underlying conditions such as seborrheic dermatitis, fungal infection of the scalp, or hormonal imbalances (such as hypothyroidism or PCOS) may result in excessive sebum production. These conditions tend to require both external treatment and internal medical support for long-term improvement. How to Manage Excess Sebum Without Over-Drying the Scalp? Fixing an oily scalp doesn't mean stripping away all its natural oils. Doing so will send your scalp into overdrive and produce even more sebum to compensate for the loss. The trick is to balance your scalp's oil levels, without disturbing its natural barrier. Here's how: Use a Sulphate-Free Shampoo Traditional clarifying shampoos often contain harsh sulphates that dry out both the scalp and hair. Instead, choose a sulphate-free shampoo specifically formulated for oily scalps.  Look for ingredients like Salicylic Acid to gently exfoliate scalp buildup & unclog pores, Tea Tree to purify and soothe the scalp, and Hyaluronic Acid or Pentavitin to maintain root-to-tip hydration. Bare Anatomy’s Oil Control Shampoo uses a science-backed blend of actives to reduce excess oil up to 100% without drying out your lengths. It’s suitable for both men & women, helps balance scalp pH, and is the ideal shampoo for oily scalp and dry hair. Space Out Your Wash Days Thoughtfully While excessive washing deprives your scalp of its oil, leaving the scalp unwashed for long exposes it to dirt, sebum, and product buildup. If your scalp frequently becomes greasy, try shampooing 2–3 times per week using a balancing shampoo that removes oils & impurities while keeping the ends hydrated. Avoid Heavy Conditioners on the Roots Conditioners are essential for moisturising dry lengths, but applying them too close to your roots can weigh down your hair and worsen oiliness. Stick to applying conditioner from mid-length to ends only, and opt for lightweight, silicone-free formulas when possible. Exfoliate Your Scalp Weekly Just as your skin, your scalp also needs regular exfoliation to remove dead skin cells, oil residue, and buildup. Treat it with Bare Anatomy Scalp Scrub, which blends physical exfoliants with natural AHAs to thoroughly cleanse the scalp. Use it once a week to keep follicles open and enhance product penetration, promoting a nourishing environment for overall hair health. Rinse with Lukewarm Water Washing your hair with hot water is likely to overstimulate oil glands and dry your scalp. Instead, use lukewarm or cold water to assist in balancing your scalp's moisture levels and minimizing frizz. Reevaluate Your Diet and Stress Levels Processed fat, sugar, or dairy diets can affect your body's oil production, as may chronic stress & hormonal imbalances. Consuming antioxidant-rich foods and managing stress through rest or mindfulness can help better control sebum internally. What’s the Difference between Normal Oily Scalp vs. Oily Scalp with Dandruff? It’s easy to confuse an oily scalp with dandruff, but they aren’t always the same thing. Understanding the difference can help you choose the right solution. Feature Oily Scalp Oily Scalp with Dandruff Appearance Hair gets greasy fast and feels flat Greasy roots plus visible flakes Scalp Symptoms May feel heavy but not always itchy or flaky Often itchy, red, or irritated with noticeable flaking Cause Overactive oil glands Excess sebum + Malassezia (fungal growth) Treatment Need Gentle Oil-balancing Anti-fungal scalp-soothing Recommended Shampoo Type Bare Anatomy Oil Control Shampoo Bare Anatomy Anti-Dandruff Shampoo If you're not sure which group you fall into, keep an eye out for symptoms such as itching and ongoing flaking. A regular regimen with scalp-balancing actives can help manage both concerns over time. Final Thoughts The secret to controlling an oily scalp is selecting the proper hair care routine. Rather than over-washing or getting harsh chemicals that rob your scalp, switch to gentle products that tackle oil without interfering with your scalp's natural barrier.  Simple adjustments to your routine, such as washing less frequently, clarifying once a week, and selecting products with the proper ingredients, can give you fresher, healthier-looking hair. Remember, it's not about removing sebum entirely, but about gently nourishing your scalp's natural rhythm.